|
|
Parts The main part is a two stage pressure regulator. The regulator is connector to a CO2 tank with a DIN477 thread connector. If you wish to use a CO2 soda stream bottle, you need to add a trapezoidal adapter, since the soda stream has trapezoidal threads. The output of a the regulator is connected to a solenoid valve which will open or close the gas flow due to an electrical signal. The output of the solenoid valve is connected to a needle valve. The needle valve is used to fine trim the gas flow to the diffuser in the aquarium. Below, you will find detailed information about the function and how to set the system up for proper function. Regulator  The picture shows a two stage regulator. The input (at the bottom) has standard DIN477 thread. With the red knob in the middle of the regulator, you can adjust the output pressure. The top gauge meter show the tank pressure. The gauge meter to the right show the output pressure (working pressure). To the left you will see a solenoid valve with its power control cable. A needle valve is mounted to the solenoid valve, see picture below for details. Needle valve 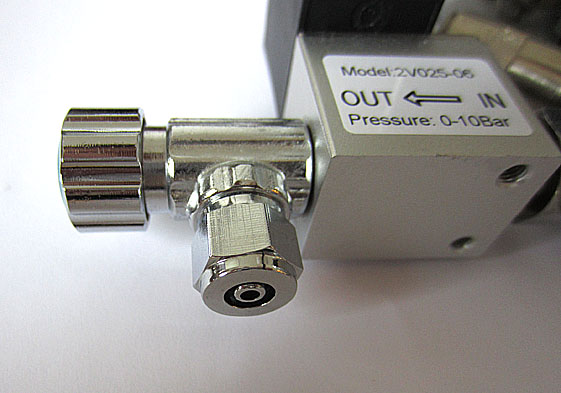 The needle valve will be used to fine tune the gas flow to the diffuser placed in the aquarium. Trapezoidal adapter for Soda stream bottle 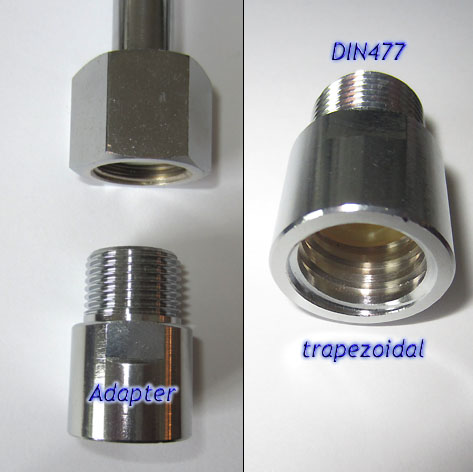 The adapter has DIN477 thread which match the regulator. The other side has trapezoidal thread which fit the Soda stream bottle. Always mount the adapter FIRST to the regulator side, then connect the Soda stream bottle. Trapezoidal adapter connected between regulator and Soda stream bottle 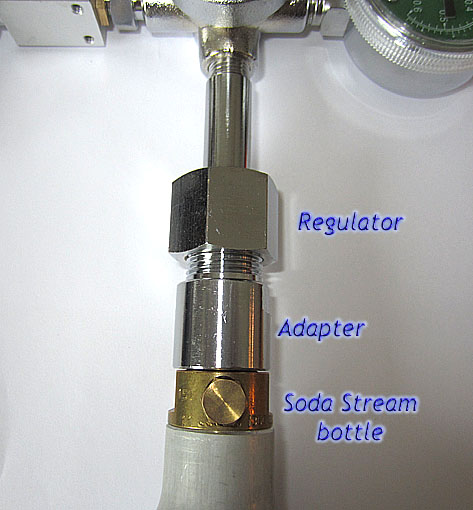 Apply water with some soap on the adapter junction to make sure you have no leakage. If there is any leakage, you will see lot of bobbles. Another alternative is to place the adapter junction under water (a bit more difficult) to see if any bobbles comes out. Test connector to power the solenoid 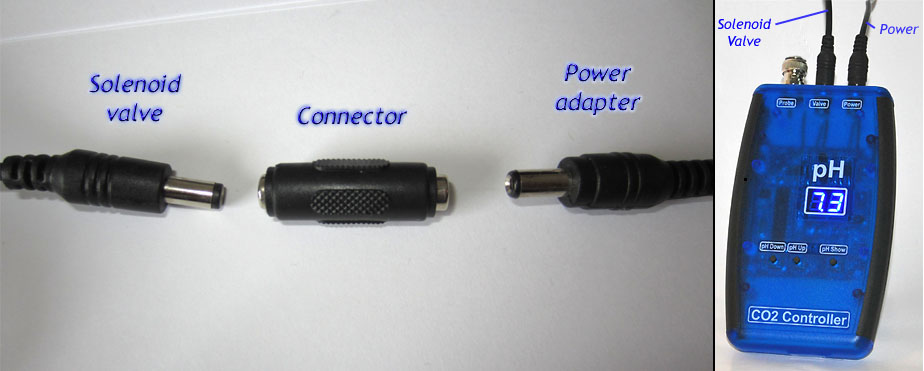 To be able to tune the gas flow from the regulator and the needle valve, the solenoid valve must be opened. During normal operation the CO2 controller will handle the solenoid valve and keeps it closed most of the time. To open the solenoid valve you have to disconnect the CO2 controller. Unplug the solenoid valve and the power adapter cables from the CO2 controller. Then connect the solenoid valve cable directly to the adapter cable by using a connector. The solenoid valve will now be feed with power constantly and thereby stay opened. (Connector is included with a regulator KIT) The connector is placed between the solenoid valve and the 12V power adapter. (The CO2 Controller is NOT used at all!) By using the connector, the solenoid valve will stay open and you can adjust the working pressure of the regulator and the flow with the needle valve. Green LED indication in the solenoid valve 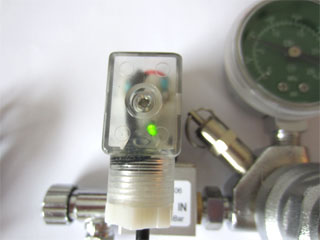 A green LED indicate that the solenoid valve has power and is opened. Set the working pressure 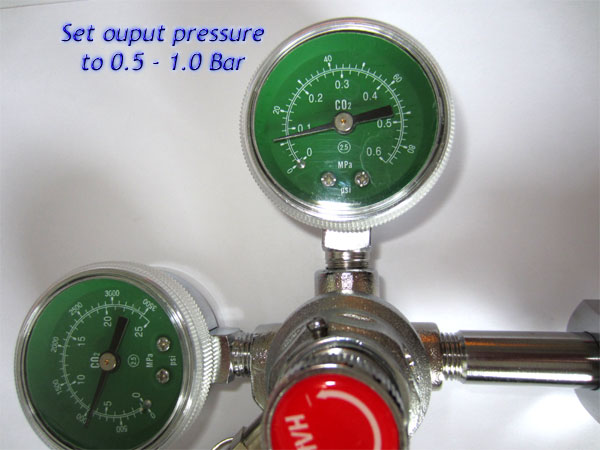 Turn the red knob to set the output working pressure. The Pressure should be from 0.5 to 1.0 Bar. (10 psi) The gauge meter on the picture above is set to 0.05 MPa (inner scale). Connect a diffuser to the output of the needle valve. Place the diffuser in a glass of water or equal. Let the gas flow for some minutes to make sure the regulator system works well. Connect the CO2 Controller 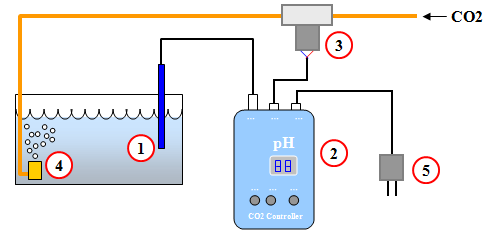 Connect the solenoid valve (3) cable and the Power adapter (5) cable to the CO2 controller. The CO2 controller will now control the system. |
|