 Arduino Fonts for LCD
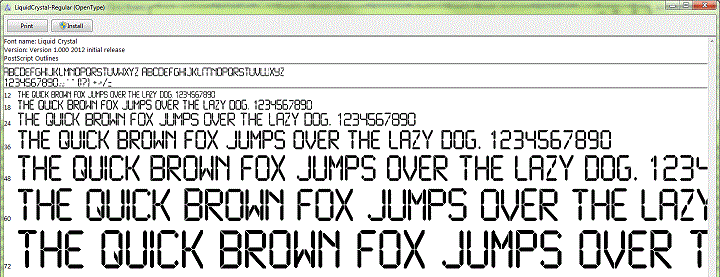
const uint8_t liquid18pt7bBitmaps[] PROGMEM = {
  0x5F, 0xA0, 0x00, 0x06, 0x00, 0x0C, 0x00, 0x38, 0x00, 0x70, 0x01, 0xC0,
  0x03, 0x80, 0x0E, 0x00, 0x1C, 0x00, 0x70, 0x01, 0xE0, 0x03, 0x80, 0x07,
  0x00, 0x0C, 0x00, 0x18, 0x00, 0xC0, 0x03, 0x80, 0x07, 0x00, 0x1E, 0x00,
  0x38, 0x00, 0xF0, 0x01, 0xC0, 0x07, 0x00, 0x0E, 0x00, 0x38, 0x00, 0x70,
  0x01, 0xC0, 0x03, 0x80, 0x06, 0x00, 0x00, 0x1F, 0xF8, 0x3F, 0xFC, 0x5F,
  0xFA, 0xE0, 0x07, 0xE0, 0x07, 0xE0, 0x07, 0xE0, 0x07, 0xE0, 0x07, 0xE0,
  0x07, 0xE0, 0x07, 0xE0, 0x07, 0xE0, 0x07, 0xE0, 0x07, 0x40, 0x02, 0x40,
  0x02, 0xE0, 0x07, 0xE0, 0x07, 0xE0, 0x07, 0xE0, 0x07, 0xE0, 0x07, 0xE0,
  0x07, 0xE0, 0x07, 0xE0, 0x07, 0xE0, 0x07, 0xE0, 0x07, 0x5F, 0xFA, 0x3F,
  0xFC, 0x1F, 0xF8, 0x08, 0x73, 0xDF, 0xFF, 0xFD, 0xC7, 0x1C, 0x71, 0xC7,
  0x1C, 0x20, 0x87, 0x1C, 0x71, 0xC7, 0x1C, 0x71, 0xC7, 0x1C, 0x71, 0xC2,
  0x1F, 0xF8, 0x3F, 0xFC, 0x5F, 0xFA, 0xE0, 0x07, 0xE0, 0x07, 0x60, 0x07,
  0x00, 0x07, 0x00, 0x07, 0x00, 0x07, 0x00, 0x07, 0x00, 0x07, 0x00, 0x07,
  0x00, 0x07, 0x1F, 0xFA, 0x3F, 0xFC, 0x5F, 0xF8, 0xE0, 0x00, 0xE0, 0x00,
  0xE0, 0x00, 0xE0, 0x00, 0xE0, 0x00, 0xE0, 0x00, 0xE0, 0x00, 0xE0, 0x00,
  0xE0, 0x00, 0xDF, 0xF8, 0xBF, 0xFC, 0x7F, 0xFE, 0xFF, 0xF1, 0xFF, 0xF1,
  0xFF, 0xF0, 0x00, 0x70, 0x00, 0xE0, 0x01, 0xC0, 0x03, 0x80, 0x07, 0x00,
  0x0E, 0x00, 0x1C, 0x00, 0x38, 0x00, 0x70, 0x00, 0xE3, 0xFF, 0x8F, 0xFE,
  0x0F, 0xFE, 0x00, 0x0E, 0x00, 0x1C, 0x00, 0x38, 0x00, 0x70, 0x00, 0xE0,
  0x01, 0xC0, 0x03, 0x80, 0x07, 0x00, 0x0E, 0xFF, 0xFB, 0xFF, 0xE3, 0xFF,
  0x80, 0x00, 0x02, 0x00, 0x07, 0x60, 0x07, 0xE0, 0x07, 0xE0, 0x07, 0xE0,
  0x07, 0xE0, 0x07, 0xE0, 0x07, 0xE0, 0x07, 0xE0, 0x07, 0xE0, 0x07, 0xE0,
  0x07, 0x5F, 0xFA, 0x3F, 0xFC, 0x1F, 0xFA, 0x00, 0x07, 0x00, 0x07, 0x00,
  0x07, 0x00, 0x07, 0x00, 0x07, 0x00, 0x07, 0x00, 0x07, 0x00, 0x07, 0x00,
  0x07, 0x00, 0x07, 0x00, 0x07, 0x00, 0x07, 0x00, 0x02, 0x7F, 0xFE, 0xBF,
  0xFC, 0xDF, 0xF8, 0xE0, 0x00, 0xE0, 0x00, 0xE0, 0x00, 0xE0, 0x00, 0xE0,
  0x00, 0xE0, 0x00, 0xE0, 0x00, 0xE0, 0x00, 0xE0, 0x00, 0xE0, 0x00, 0xDF,
  0xF8, 0x3F, 0xFC, 0x1F, 0xFA, 0x00, 0x07, 0x00, 0x07, 0x00, 0x07, 0x00,
  0x07, 0x00, 0x07, 0x00, 0x07, 0x40, 0x07, 0xE0, 0x07, 0xE0, 0x07, 0x5F,
  0xFA, 0x3F, 0xFC, 0x1F, 0xF8, 0x1F, 0xF8, 0x3F, 0xFC, 0x5F, 0xF8, 0xE0,
  0x00, 0xE0, 0x00, 0xE0, 0x00, 0xE0, 0x00, 0xE0, 0x00, 0xE0, 0x00, 0xE0,
  0x00, 0xE0, 0x00, 0xE0, 0x00, 0xE0, 0x00, 0xDF, 0xF8, 0x3F, 0xFC, 0xDF,
  0xFA, 0xE0, 0x07, 0xE0, 0x07, 0xE0, 0x07, 0xE0, 0x07, 0xE0, 0x07, 0xE0,
  0x07, 0xE0, 0x07, 0xE0, 0x07, 0xE0, 0x07, 0x5F, 0xFA, 0x3F, 0xFC, 0x1F,
  0xF8, 0x7F, 0xFF, 0xFF, 0xF7, 0xFF, 0x80, 0x02, 0x00, 0x08, 0x00, 0x60,
  0x01, 0x80, 0x0E, 0x00, 0x38, 0x01, 0xC0, 0x07, 0x00, 0x18, 0x00, 0x60,
  0x01, 0x00, 0x30, 0x00, 0xC0, 0x07, 0x00, 0x1C, 0x00, 0xF0, 0x03, 0x80,
  0x1E, 0x00, 0x70, 0x03, 0xC0, 0x0E, 0x00, 0x70, 0x01, 0xC0, 0x06, 0x00,
  0x18, 0x00, 0x1F, 0xF8, 0x3F, 0xFC, 0x5F, 0xFA, 0xE0, 0x07, 0xE0, 0x07,
  0xE0, 0x07, 0xE0, 0x07, 0xE0, 0x07, 0xE0, 0x07, 0xE0, 0x07, 0xE0, 0x07,
  0xE0, 0x07, 0xE0, 0x07, 0x5F, 0xFA, 0x3F, 0xFC, 0x5F, 0xFA, 0xE0, 0x07,
  0xE0, 0x07, 0xE0, 0x07, 0xE0, 0x07, 0xE0, 0x07, 0xE0, 0x07, 0xE0, 0x07,
  0xE0, 0x07, 0xE0, 0x07, 0x5F, 0xFA, 0x3F, 0xFC, 0x1F, 0xF8, 0x1F, 0xF8,
  0x3F, 0xFC, 0x5F, 0xFA, 0xE0, 0x07, 0xE0, 0x07, 0xE0, 0x07, 0xE0, 0x07,
  0xE0, 0x07, 0xE0, 0x07, 0xE0, 0x07, 0xE0, 0x07, 0xE0, 0x07, 0xE0, 0x07,
  0x5F, 0xFB, 0x3F, 0xFC, 0x1F, 0xFB, 0x00, 0x07, 0x00, 0x07, 0x00, 0x07,
  0x00, 0x07, 0x00, 0x07, 0x00, 0x07, 0x00, 0x07, 0x00, 0x07, 0x00, 0x07,
  0x1F, 0xFA, 0x3F, 0xFC, 0x1F, 0xF8 };

const GFXglyph liquid18pt7bGlyphs[] PROGMEM = {
  {     0,   3,   4,   5,    1,   -3 },   // 0x2E '.'
  {     2,  15,  28,  18,   -1,  -27 },   // 0x2F '/'
  {    55,  16,  28,  18,   -1,  -27 },   // 0x30 '0'
  {   111,   6,  28,  18,    4,  -27 },   // 0x31 '1'
  {   132,  16,  28,  18,   -1,  -27 },   // 0x32 '2'
  {   188,  15,  28,  18,    0,  -27 },   // 0x33 '3'
  {   241,  16,  28,  18,   -1,  -27 },   // 0x34 '4'
  {   297,  16,  28,  18,   -1,  -27 },   // 0x35 '5'
  {   353,  16,  28,  18,   -1,  -27 },   // 0x36 '6'
  {   409,  14,  28,  18,    0,  -27 },   // 0x37 '7'
  {   458,  16,  28,  18,   -1,  -27 },   // 0x38 '8'
  {   514,  16,  28,  18,   -1,  -27 } }; // 0x39 '9'

const GFXfont liquid18pt7b PROGMEM = {
  (uint8_t  *)liquid18pt7bBitmaps,
  (GFXglyph *)liquid18pt7bGlyphs,
  0x2E, 0x39, 37 };

// Approx. 661 bytes
|
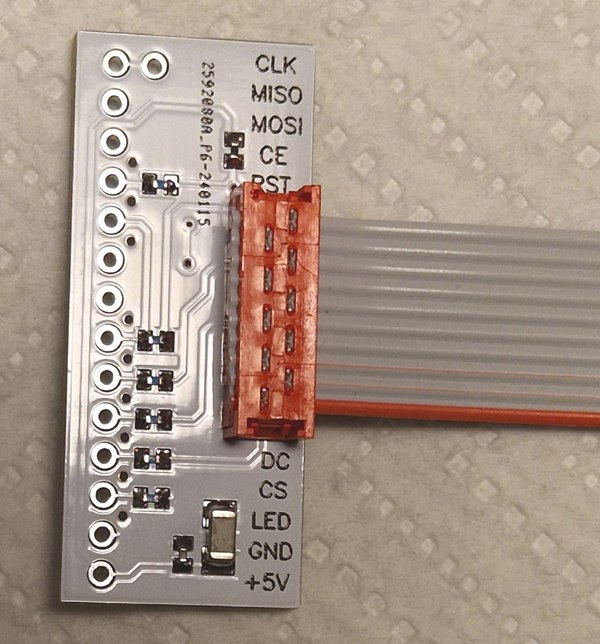
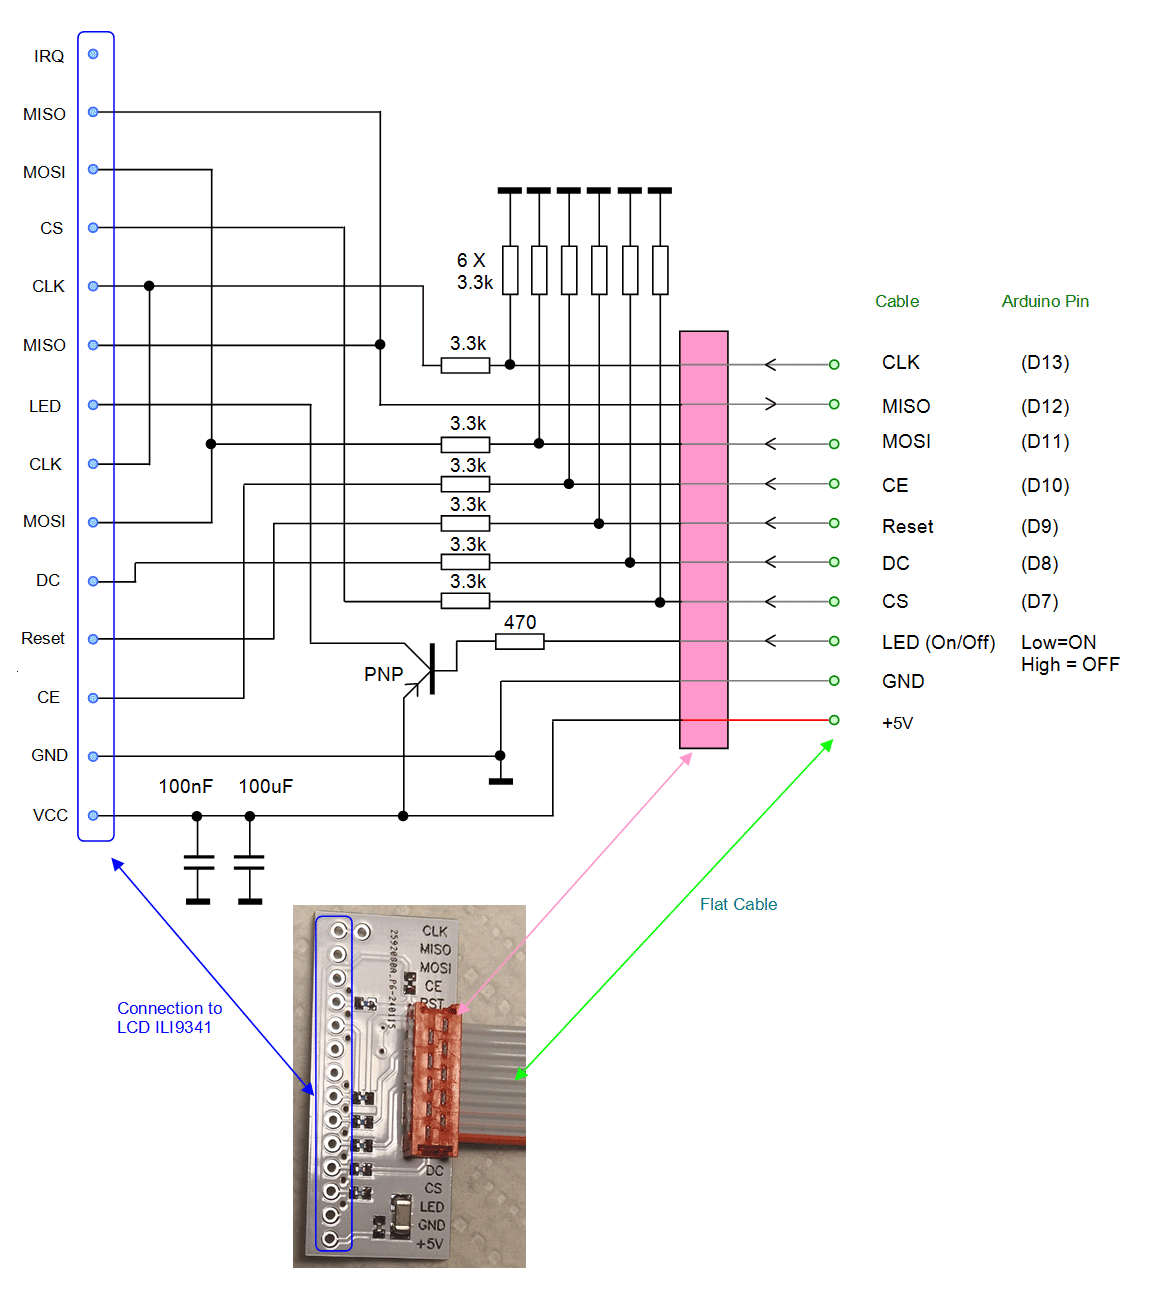
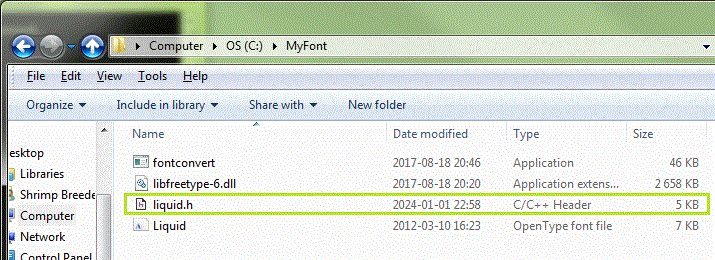
 I will use two tabs, one is for my Arduino code and the next tab will contain the liquid.h font-data
/*
Filename: FontExample.ino
This Example will print text to the display using a new font.
The font is defined in the TAB Myfont.h
*/
// ==============================================================================================================
// Include libraries
// ==============================================================================================================
#include "Adafruit_GFX.h" // Graphic Library
#include "Adafruit_ILI9341.h" // Graphic Library
#include "Myfont.h" // New font
// ==============================================================================================================
// Define Pins ILI9341 Setup
// ==============================================================================================================
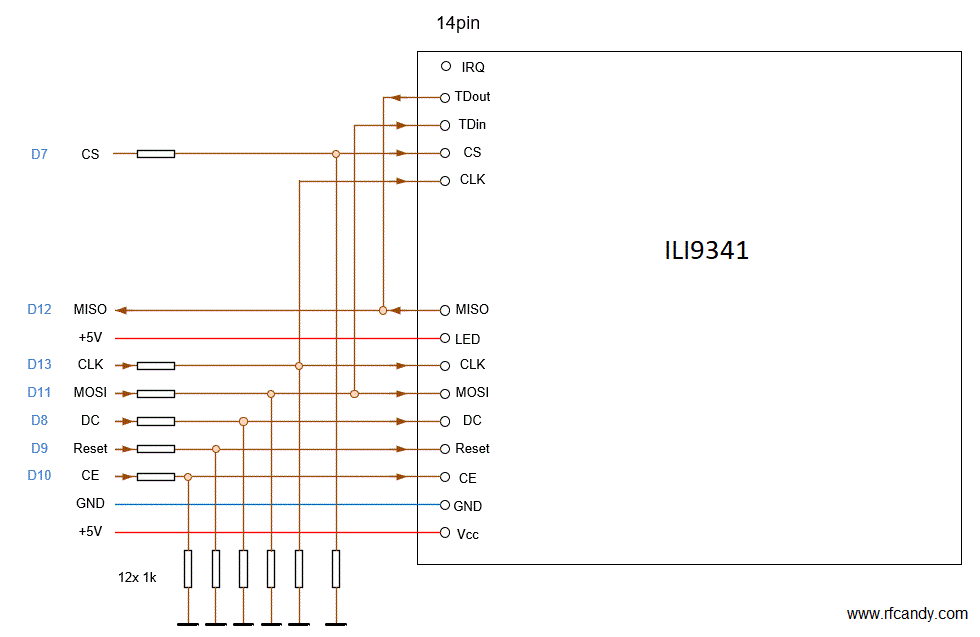
// Define pins used by Arduino to control the LCD
#define TFT_DC 8 // Define which pin LCD DC use
#define TFT_CS 10 // Define which pin LCD CS use
#define TFT_RST 9 // Define which pin LCD RST use
// Use hardware SPI (on Uno, #13, #12, #11) and the above for CS/DC
Adafruit_ILI9341 tft = Adafruit_ILI9341(TFT_CS, TFT_DC, TFT_RST); // Define SPI pins
// ==============================================================================================================
// Arduino Main Setup
// ==============================================================================================================
void setup() {
tft.begin(); // Init Display
//------------- Define Port Input/Output ------
pinMode (7, OUTPUT); // Define pin for CE touch-screen
//------------- Set Pin High/Low --------------
digitalWrite(7,HIGH); // Disconnect touch-screen
}
// ==============================================================================================================
// Arduino Main Loop
// ==============================================================================================================
void loop(void) {
tft.setRotation(1); // Set rotation of the Display
tft.fillScreen(ILI9341_BLACK); // Clear the screen
tft.setFont(&liquid18pt7b); // Use the new font
tft.setTextColor(0x16FF); // Set color
tft.setCursor(70, 80); // Define position to put the text
tft.setTextSize(1); // Set size of the text
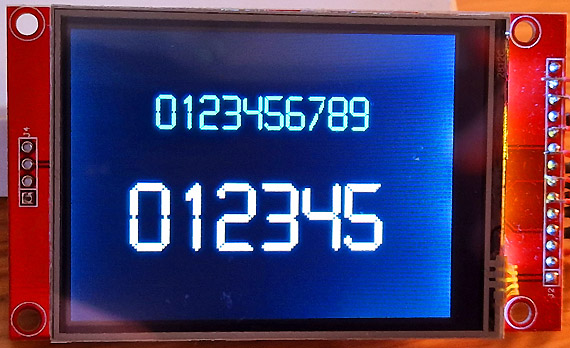
tft.println("0123456789"); // Write some text
tft.setTextColor(0xFFFF); // Set color
tft.setCursor(50, 180); // Define position to put the text
tft.setTextSize(2); // Set size of the text
tft.println("012345"); // Write some text
delay(10000);
}
|
Download Software here |
|
GIT Hub : Adafruit_BusIO_Register
GIT Hub : Adafruit_GFX GIT Hub : Adafruit_ILI9341 My Mirror : Adafruit_BusIO_Register.rar My Mirror : Adafruit_GFX.rar My Mirror : Adafruit_ILI9341.rar Arduino Example #1: FontExample.zip (2k) Arduino Example #1: FontExample.rar (2k) Convert font: FontConvert.rar Support #1: How to install Library Support #2: How to install Library |
|