Mixer testing of FM-receiver.
This is a FM receiver which can operate from 60 to 160MHz with
a sensitive of less than 1uV. This receiver is built on a minimum
number of components. The receiver is very stable because it use a
frequency synthesizer to set the receiving frequency.
All contribution to this page are most welcome!

Background
This receiver is a general purpose FM-receiver. It can be used to receive commercial radio or you can use it for 2m or maybe NOOA-satelite reception. This system can receive from 60MHz to 160MHz. The Synthesizer can work down to 25MHz and up to 1.1GHz so with few adjustment of the input stage and VCO you can easy change the frequency.

The main reason why I build this receiver is because I wanted to test a synthesizer from Philips called UMA1015 and I also wanted to test different mixers. One circuit and one dulagate FET.

UMA1015 is a very easy PLL to use and cheap. I also wanted to test how a dualgate FET would work as mixer (more of this later). Since I have many MC3371 circuits I also wanted to test the performance of this receiver against my other receivers I built on MC13136 and my Trident TRX100 handscanner.
In this project I will use a different IF-frequency. Most often I have used 455kHz and 10.7MHz, but now I will test a 21.4MHz crystal filter and therefor I will make the IF-frequency to 21.4MHz.

Schematic
Let's have a look at two schematic with different type of input stage and mixer.

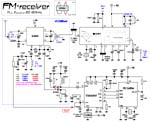
VCO/Mixer one:
Click on the pic to see larger schematic! The RF enter the antenna into the tuned LC unit L1 and C1. You can connect the antenna to a tap point of L1 to achieve best performance, but it takes some experimenting to find the best tap point place of L1.
The signal enter the mixer circuit SA602. The output of the mixer is connected to C3 and L3, which should be tuned to 21.4MHz.

The SA602 has an internal oscillator. C2 and L2 is the tank oscillator. Parallel with C2 and L2 is a varicap BB149A. By changing the voltage over this varicap the oscillation frequency will vary. A small portion of the signal is taken from pin 7down to a dualgate FET which amplify the signal. A pot of 47k is connected to pin 7 of SA604 as well. This pot set the current in the oscillator and thereby amplify the VCO signal.Most often you wont need this pot.

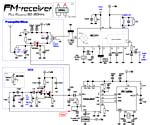
VCO/Mixer two:
Click on the pic to see larger schematic! In this schematic you will find a dualgate FET instead of a SA602 mixer circuit.

The hart of this receiver is the VCO (Voltage controlled Oscillator).
I use a FET transistor and a LC unit to achieve the oscillation.
C2 and L2 is the resonating circuit and there is a tap point of L2 to the source of the FET. Parallel with C2 and L2 is a varicap diod BB149A. By changing the voltage over this diode the capacitance will change and therefore the frequency of the oscillator. I don't want this VCO to have wide band so I have used a small capacitance 3.9pF to connect the varicap to the C2 and L2. A larger value (10-20pF) would give the VCO wider range, but the stability will then decrease and self-oscillation can occur.
Another FET is connected to the VCO and works as a buffer.

The RF enter the antenna into the tuned LC unit L1 and C1. You can connect the antenna to a tap point of L1 to achieve best performance, but it takes some experimenting to find the best tap point place of L1. The RF then enter gate 1. To gate 2 is a voltage divider connected (pot). By changing the voltage of gate 2 we can set the gain, but the mixing function is also dependent of the DC voltage so we have to experiment to find best DC level.

The output of the VCO is also enter gate 2.
Since the voltage/current amplification of a FET is not linear you will get mixing products
of the input frequencies and the VCO, which is what we want.
On the drain is a tuned LC circuit C3 and L3 This unit should be tuned to the IF-frequency of 21.4MHz.

Let's make a frequency calculation:
I want to receive at 145MHz. If the VCO is 123.6MHz I will get=>
output of the mixer = 145.0 - 123.6 = 21.4MHz (Which is the IF-frequency)

A sharp crystal filter will reject all other frequency than 21.4MHz +/- 10kHz.

FM-receiver
This receiver is based on MC3371 circuit and is the same for both mixer types above.
In this project I use a crystal of 20.945MHz to run the internal oscillator.
The IF was 21.4MHz and if we mix it with 20.945MHz, we will get the product of 455kHz which passes the 455kHz ceramic filter.
A quadcoil demodulates out the audio. The audio is a low level signal of 50-200mV. You must amplify this signal to drive a speaker.
At pin 13 you will find a RSSI output to indicate the reception strength.

Synthesizer and processor
The PLL configuration is the same for both mixer types above.
The PLL synthesizer probe the VCO to be able to set the VCO voltage (Vtune).
The VCO enter pin 6. The PLL compare the input frequency with a reference frequency.
Inside the PLL is some programmable dividers and Phase detectors.
The PLL regulate the VCO until it is set and locked to the frequency you have programmed into the PLL's register.
Pin 3 of the PLL is the Phase detector output. The PLL will regulate the current at this pin, and with some capacitors and resistors, It will produce a voltage which is feed back to the varicap at VCO through a 100k resistor. If you want you can probe (schematic Vtune) this voltage with a voltmeter and you will see how it keeps the frequency locked.

To program the PLL you need some digital interface.
The PLL has 6 register and they are 21 bit long. The data in this register set the function of the PLL and the DATA is clocked into the UMA1015 circuit.

I use a PIC16F84 to handle the digital part.
If you want software for this project or help to set the PLL register you can mail me. I advice you to read the datasheets for the UMA1015 and you will understand more how it works and how to set the registers.

Building and testing
I advice you to build this receiver in several blocks. First you should get the VCO working. Wait to solder the PLL circuit. If you have a frequency counter you can check the frequency. You can now also connect Vtune to ground resp +5V and make sure the VCO frequency changes, and is in the range you wish.
Connect the PLL and now you can monitor the Vtune voltage with a DC meter.
By changing the frequency you should also see that this voltage change. Finally you can add the preamplifier/mixer.

Conclusion
I am not satisfied with good performance, I demand perfection of my receivers and myself (which is not good).
Some say to me that the RF signals is so strong that it won't matter, but I still want my receivers to be superior in performance.
Both receivers worked well, but the sensitivity of the MC3371 is not the best.
I switched to a SA615 and the reception were improved much.

When I tested both mixer type I found that both worked but the mixer circuit SA602 were a bit better in sensitivity and noise. Maybe the FET mixer could be equal good with perfect match of input and output impedance. I still think the mixer circuit were a bit better and easier to handle. One great thing with the mixer circuit is that it has the oscillator built in which save work and components.

The sensitivity of this receivers is less than 1uV, and you will have a very good audio quality as well.

Final word
The project were a test of a PLL synthesizer circuit and two types of mixers.
I have given you the basic structure how to build a synthesized controlled receiver. When you get the receiver working you can add display, scanning function, automatic squelch control, and much more.

You can always mail me if there is anything unclear.

I wish you good luck with your projects and thanks for visit my page.


Back to main Page  |  Contact Me  |  Cheap components

Copyright © Last modified on 18 april 2003.