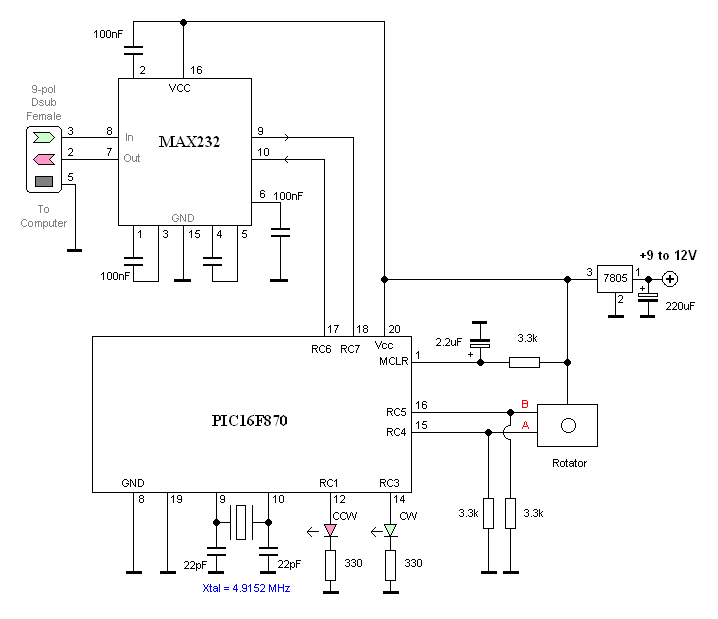
This picture show my experimental rotator for developing my softwares Rotator experiment
This homepage is dedicated to my rotator experiment.
Rotators has a wonderful function, but are almost hopless to get working.
I have had a "love and hate" relation to rotators.
A rotator can easy substitue several buttons and give smooth increament/decreamnet function.
The difficult part is to get this smooth function working properly.
As always, I had to take the bull by the horn and do something about it.
This page will explain my solution and give you some tools for your own experiments.
All contribution to this page are most welcome!

Background


A rotator has two outputs and one input, which often is connected to ground or Vcc.
The basic principle with a rotator is that the output pules from pin A and B are either +90 or -90 degree out of phase.
It sound complex, but if you look at the pictures above you will see how simple it is.
In CW rotation pulse A rise high first then pulse B. In CCW rotation it is pulse B that rise high first.

The length of the pulse reflects the rotation speed of the rotator.
By detecting which pulse that comes first (A,B), you can determin if the rotator is going CW or CCW.

There are many ways to make software for handling rotators and I will explain how I made mine.

Main software
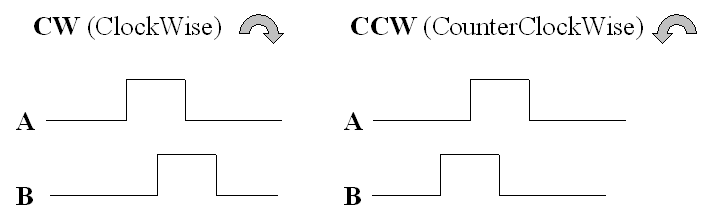
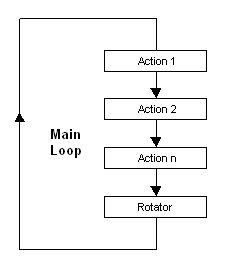
When I make software I often use a main loop which keeps repeating over and over.
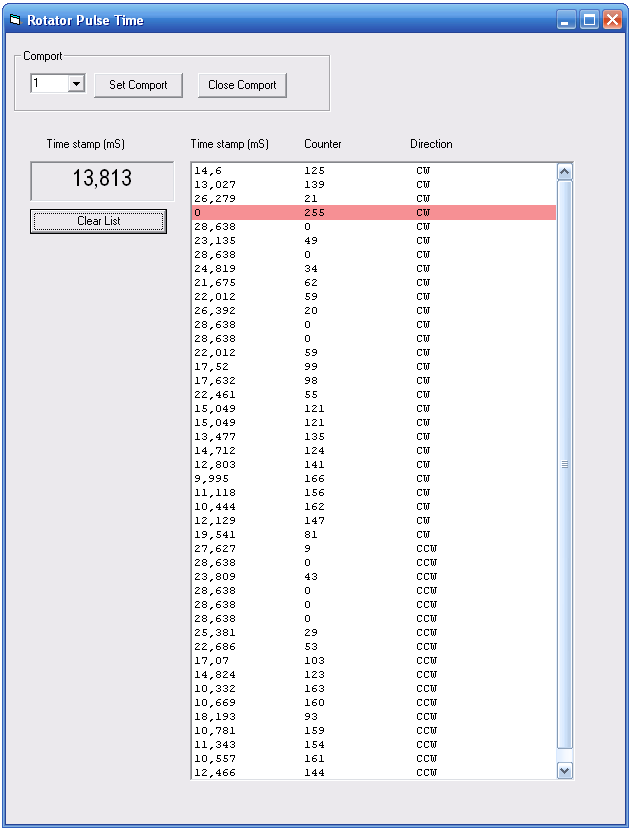
There is no long time delay in this loop, so it repeats extremly fast 10000-100000 times per second.
Inside that loop several actions occurs for testing buttons, inputs, register and so on.

If an action occurs (as a button is pressed) the software jumps into that procedure and when it is ready it goes out to the main loop again.
(I am fully confident there are other ways to program as interups and so, but I explain my way, so you will
understand the reason why I have made my rotator program as I have.)

Rotator software
The rotator software checks the rotator signal A and B, and reply the status with a 8-bit register (rotator register) which gives all status about the rotator.
The status register will report if rotation has occured CW or CCW and the speed.
Bit 7 is set if a rotation has occured.
Bit 6 tell you if the rotation was CW or CCW.
the 3 low bits represent the rotator speed (0-4).

So what I do in my main program is that i run the rotator procedure and then check the content of the "rotator register" to see if bit 7 is set.
If bit 7 is set a rotation has occured. If bit 7 is not set (no rotation occured), the software goes back to the main loop.

So, what happends in the rotator procedure then?


In this procedure I check the status of the two inputs A and B to find out if rotation has started. I also control the speed and if rotation is CW or CCW.

The picture above show you the two signals A and B from the rotator.
In the green area both lines A and B are low, and nothing has happened. The software do nothing and return to the main loop.
In the yellow area the A i high, which means that the rotator has started to move in CW direction.
The software then waits for the signal B to rise which happens in the red area.
When the signal B rises, a timer (rotator time) starts to measure the length of the high pulse.
My timer start with the value 255 and decreaments one step every 112 uS.
Eventually B goes low and the we have a counting value representing the time of the pulse.
The max time I can measure is 255*112uS = 28.5mS

If the counter reach zero and the B puls is still high, the software will stop the rotator timer and wait for the B pulse to go low.
This means that the max time I can measure a pulse is 255 steps equal to 28.5mS. In practical, there is no need to measure longer pulses.

In the picture above you will also find another timer called watchdog time. This timer is added for saftey precaution. Let's go back a bit again.
Let say A goes high (yellow area), the software then waits for B to go high, but what happens if B never go high for some reason?
Then the software is stuck waiting for B to go high, which is not good.

When A is high a timer is started (watchdog time) which waits max 128mS for B to go high.
If B has not gone high during this time, something is wrong (no valid rotation ocured) and the software leaves the rotator procedure and returns to the main loop.

When I have a valid rotator time I will also know if the rotation was CW or CCW. The software then set the rotator register bits.

Practical measurements
In theory it all sound great doesn't it, but in reality we bump into problems as bouncing.
You remember that my timer started at 255 and counted down.
In practical experiments I have noticed that the time for one pulse (one step of the rotator) vary very much. it can be 8mS to 28mS and sometimes less than 1mS.

in my software I have set up some limits to measure the speed of the rotator.

Values (speed) from 0 to 181 is considered as slow speed = one increament of the rotator.
Values (speed) between 182 and 245 is considered as normal time = several increaments of the rotator.
Values (speed) from 246 to 255 is considered as short time (bounces) = one increament of the rotator.

Conclusion:
If the time was long (less than 182) or to fast (more than 245) we will consider this as one rotator step. The rotator register will be set to give speed 0.

If the time was from 245-182, normal value for the pulse we get 245-182 = 63 steps. I divide this value with 16 and increament the value by one to get value from 1 to 5 representing the rotator time (the time pulse B is high). The rotator register will be set to give speed 0 to 4 (5 steps).

The rotator software has detected a rotation of the rotator and indentified if it was CW or CCW. It has also measured the time of the pulse length.
Depending on the puls length, the software calculates a speed value from 0 to 4 representing the rotation speed. 0 means one step (one increment) and 1-4 represent an incresed rotation speed where 4 is max.

Testing software
I have made a testing software to measure the pulse time of the rotator. The software show the pulse time in mS and rotator value (255-0) and CW/CCW.
remember that the counter start at 255 and count down so the rotator value 255 = fast, and 0 = slow.
This program has not the limits added, it show the rotator value from 255 to 0.

I start by turning the rotator CW one step at a time. My first measurement is 14.6mS then 13mS, 26mS.
You can see how much they vary and still it is just one step at a time. Suddenly Boom we get 0 mS (red marked).
The rotator is not moving with max speed, just one step at a time so here we have a bounce! Now you understand why I set the limit to detect bounces and consider them as one step increament.
I then increment the rotation speed a bit and change the direction and you can see it by the CCW information.

At top you can set which comport you use and the list can be cleared with the button called Clear List.


Schematic for the rotator tester
Here is the schematic for the rotator tester.It is based on the PIC16F870 and you have two inputs A (pin 15) and B (pin 16). Two leds indicate rotation during test.


Software

Download PIC16F870 program (INHX8M format)
TESTA_ROT_3.zip rotary control software (the hex file is zipped!).


Download rotary INC file
rotary_inc.zip rotary asm file


Download windows software
rotary.zip (2.2Mb)
Click here to go to the software download page!


Final word
In this project I explain my aproach of controlling a rotator to get it working properly.
I want to emphesise that I am not an expert in programming and I am fully confident there are other ways to control rotators.
I just want to show my way to solve this matter and I am very happy with the results.


Back to main Page  |  Contact Me  |  Cheap components

Copyright © Last modified on 22 Dec 2009.